Hardware Setup & Location
Before any software configuration, the physical hardware must be correctly positioned. GPS accuracy depends heavily on a clear, unobstructed view of the sky and a stable RTK correction data stream delivered over WiFi. This section covers where to set up and how to connect all hardware components.
Step 1 — WiFi Extender Placement
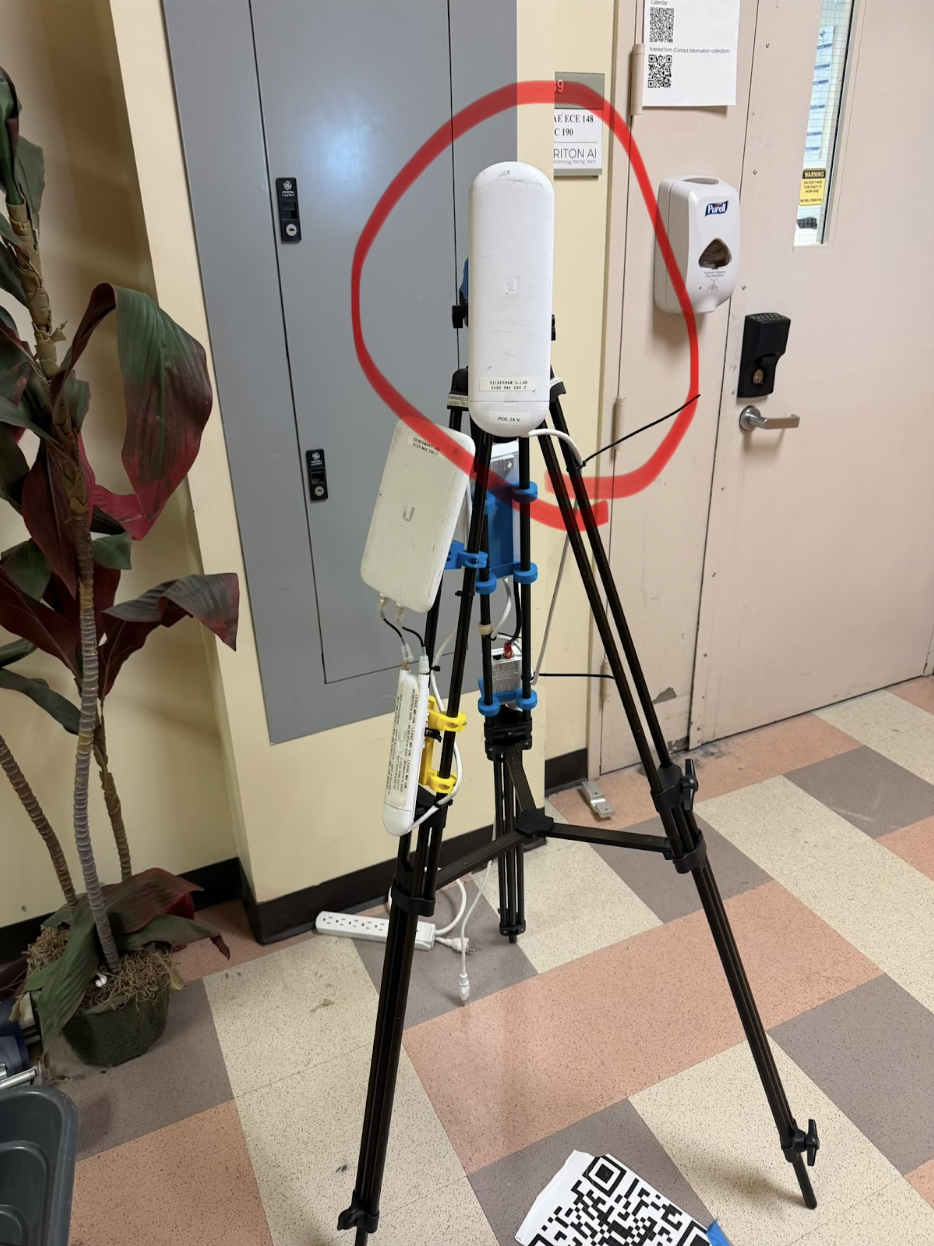
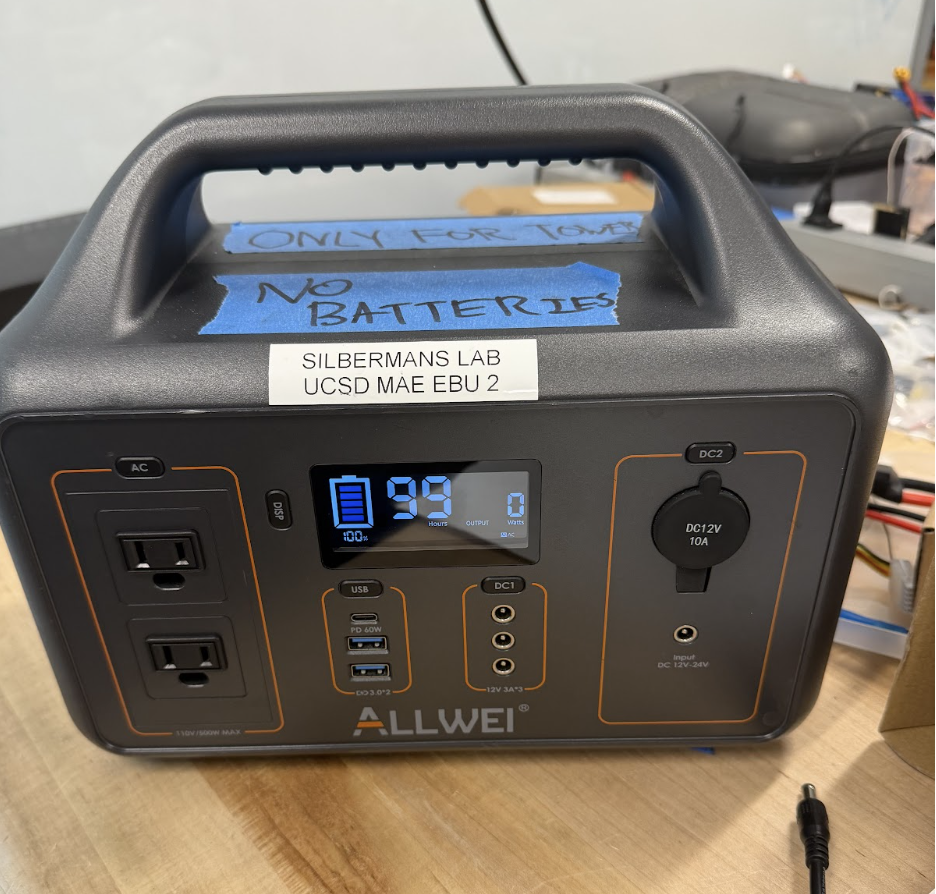
The WiFi extender bridges the campus network to the car's Raspberry Pi, allowing RTK correction data to stream continuously from the Polaris network. Signal strength is the single most important factor for GPS accuracy — a weak connection causes the correction stream to drop and degrades precision from centimeters to meters.
Step 2 — Testing Area Map
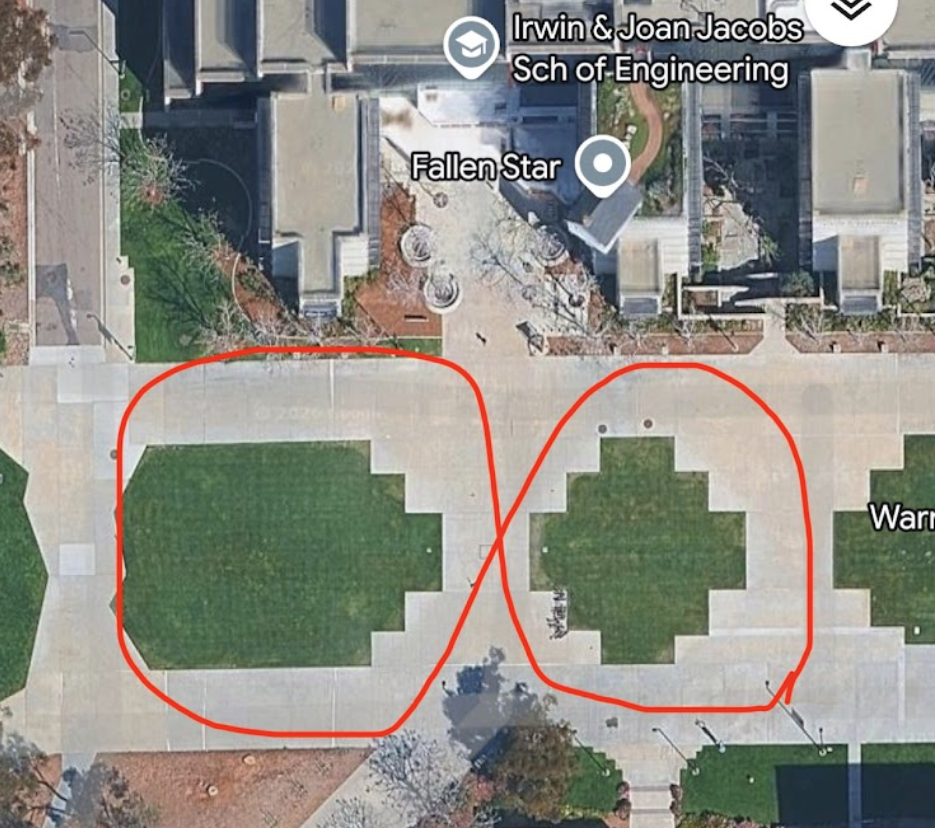
The two circled areas on the map below show the recommended driving loops in Warren Mall. Both provide open sky exposure and enough clear pavement for a smooth path-following run. Stay within these areas to maintain WiFi signal strength and avoid pedestrian hazards.
Step 3 — GPS Unit (PointOneNav) Placement
The PointOneNav unit does not require any manual configuration on first use — it streams NMEA data immediately upon power-up. However, where you physically mount the antenna has a large impact on accuracy.
/dev/ttyUSB0 or /dev/ttyUSB1. You will configure the exact port in later steps.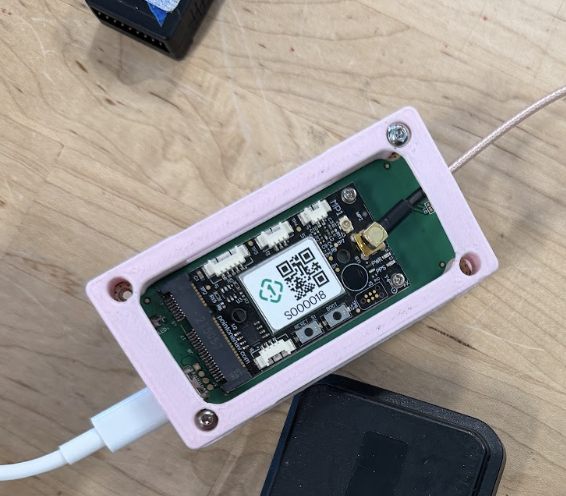
[LLA=nan, nan, nan] — this is expected behavior, not an error. Step outside to Warren Mall before expecting valid coordinate data. Allow 30–60 seconds after going outside for the RTK fix to converge.User Permissions & Miniforge Install
The GPS software requires two things before it can run: (1) your Pi user must be in the dialout group so it can open serial/USB ports without sudo, and (2) a Miniforge-managed Python 3.7 environment to host the GPS drivers without conflicting with the system Python or the DonkeyCar environment.
Step 1 — Grant USB Device Permissions
Linux restricts access to serial ports (/dev/ttyUSB*) to members of the dialout group. Without this, you will get a Permission denied error when the GPS driver tries to open the port.
sudo adduser pi dialout   # Add 'pi' user to the dialout group
sudo reboot now           # Group membership only takes effect after a reboot
groups to check. If dialout is already listed, the reboot is optional — but rebooting ensures a clean state for the session ahead.Step 2 — Clone the Quectel Repository
The PointOneNav runner script lives inside the quectel/p1_runner directory. This repository contains the configuration tool, the runner script, and all supporting files needed to receive RTK corrections.
git clone https://github.com/UCSD-ECEMAE-148/quectel
cd quectel/p1_runner
Step 3 — Install Miniforge
Miniforge provides conda and mamba — fast, lightweight Python environment managers. We use Miniforge to create a sandboxed Python 3.7 environment specifically for the GPS software, so it never conflicts with DonkeyCar's Python stack or system packages.
# Download the Miniforge installer for the current architecture (ARM64 on a 64-bit Pi)
wget "https://github.com/conda-forge/miniforge/releases/latest/download/Miniforge3-$(uname)-$(uname -m).sh"

# Run the installer — accept the license and confirm all defaults when prompted
bash Miniforge3-Linux-aarch64.sh

# Reboot so that conda is added to your PATH
sudo reboot now
$(uname -m) substitution produces aarch64 on a 64-bit Pi. If you get a "file not found" error, your Pi may be running a 32-bit OS. Verify with uname -m — if it shows armv7l, download the armv7l installer manually from the Miniforge GitHub releases page.Validation — Miniforge Installed Correctly
conda --version   # Expected: conda 23.x.x or similar
mamba --version   # Expected: mamba x.x.x
# If both commands print version numbers, Miniforge is installed correctly.
Python Environment & GPS Configuration
With Miniforge installed, we create an isolated Python 3.7 environment named py37 and install the GPS client libraries into it. We then install those same libraries into the DonkeyCar virtual environment (~/env) so that DonkeyCar can also read the GPS serial data independently. Finally, we use the config_tool.py script to reset the GPS to factory defaults and configure it to output NMEA GGA sentences over USB — the format DonkeyCar reads.
Step 1 — Create the py37 Environment and Install GPS Libraries
This environment is used exclusively by the runner.py script in Terminal 1 to receive RTK correction data from the Polaris network.
mamba create -n py37 -c conda-forge python=3.7 pip   # Create the sandboxed environment
mamba activate py37                                        # Enter the environment

# Install GPS client libraries inside py37
pip install pyserial fusion_engine_client pynmea ntripstreams websockets
Why Python 3.7? The fusion_engine_client library from PointOneNav was written for Python 3.7. Higher versions may work, but have caused silent import failures during testing on the Pi's ARM architecture.
Step 2 — Install GPS Libraries into the DonkeyCar Environment
DonkeyCar reads GPS data directly from the serial port using its own process. That means the DonkeyCar virtual environment (~/env) also needs the GPS libraries installed. This step is separate from Step 1 — you are installing the same packages into a different environment.
# Deactivate py37 and any other active environment first
conda deactivate   # Repeat until neither (base) nor (py37) appears in the prompt

# Activate the DonkeyCar virtual environment
source ~/env/bin/activate   # Prompt should now show (env)

cd ~/quectel/p1_runner

# Upgrade build tools, then install project requirements
python -m pip install -U pip setuptools wheel
python -m pip install -r requirements.txt

# Install the GPS libraries into the DonkeyCar environment
pip install pyserial fusion_engine_client pynmea ntripstreams websockets

# ── GPS HARDWARE CONFIGURATION ────────────────────────────────────────────────
# 1. Reset the GPS to factory defaults to clear any conflicting settings
python3 bin/config_tool.py reset factory

# 2. Configure the GPS to output NMEA GGA sentences over USB (UART2)
python3 bin/config_tool.py apply uart2_message_rate nmea gga on

# 3. Save the settings to non-volatile memory so they persist across power cycles
python3 bin/config_tool.py save
Step 3 — Activate the Correct Environment Before Running
Terminal 1 (the GPS runner) uses the py37 conda environment. Terminal 2 (DonkeyCar) uses only the DonkeyCar venv (~/env). Keep these terminals separate — do not mix environments between them. The commands below show how to set up Terminal 1 correctly before launching the runner in §4.
# Start from a clean state
deactivate            # Exits any active virtualenv (e.g., ~/env)
conda deactivate      # Exits any active conda environment

# Activate py37 for the runner
conda activate py37

# Verify — should print Python 3.7.x
python --version
Validation — GPS Hardware Configured Correctly
# List available serial ports — the GPS should appear as /dev/ttyUSB0 or /dev/ttyUSB1
python3 -c "import serial.tools.list_ports; print(list(serial.tools.list_ports.comports()))"

# Example of a successful response:
# [<serial.tools.list_ports_linux.SysfsPort object> - /dev/ttyUSB1 'CP2102 USB to UART Bridge']
Running GPS RTK Corrections
Standard GPS has 2–5 meters of positional error — enough to miss a curb by a full car width. RTK (Real-Time Kinematic) corrections reduce this to 1–3 centimeters by streaming differential correction data from a fixed reference station. The PointOneNav Polaris service provides this correction stream over the internet.
Step 1 — Launch the Runner
Each robot has a unique Device ID and Polaris Password assigned for the class. Look up your robot's credentials in the table at the bottom of this section and substitute them into the command below. The --device-port flag specifies which USB port the GPS receiver is connected to.
# Replace --device-id and --polaris with YOUR robot's credentials from the table below
# Try USB1 first — this is the most common port assignment
python3 bin/runner.py \
  --device-id   YOUR_DEVICE_ID \
  --polaris     YOUR_POLARIS_PASSWORD \
  --device-port /dev/ttyUSB1

# If the above fails with "no such file" or "device busy", try USB0 instead:
python3 bin/runner.py \
  --device-id   YOUR_DEVICE_ID \
  --polaris     YOUR_POLARIS_PASSWORD \
  --device-port /dev/ttyUSB0
ls /dev/ttyUSB* before and after plugging in the GPS. The new entry that appears is the GPS port. If a LiDAR is also connected, the GPS is usually on the higher-numbered port.Step 2 — Verify Output
| What You See | What It Means | Action |
|---|---|---|
Device reset complete. Starting data logging. | GPS is communicating correctly with the Pi | ✓ Good — proceed |
[LLA=nan, nan, nan] | No satellite signal — car is indoors | Step outside and wait 30–60 s |
[LLA=32.88xxx, -117.23xxx, xxx] | Valid RTK fix — UCSD coordinates | ✓ Excellent — RTK is working |
Connection refused or timeout | No internet — WiFi extender not connected | Check that the extender is powered and facing EBU2 |
Class Credentials Reference
| Robot # | Device ID (--device-id) | Polaris Password (--polaris) |
|---|---|---|
| 1 | yZ952ezI | 3gGOrFMX |
| 2 | Ghhiex3O | keH10zzC |
| 3 | M3Xs2msm | LLmh1ADV |
| 4 | cgHZsEcU | 3Eo2z0GE |
| 5 | 0Tm0Qj1L | g8k5Folx |
| 6 | rQ2gKIc6 | Li48DbiF |
| 7 | gbUv1nO2 | zZLxzLpJ |
| 8 | GCmQ3XDt | AMvS1q8u |
| 9 | ixBGb9jc | XSBhczy3 |
| 10 | xaCudmmI | qQO65WfS |
| 11 | pigavQHt | yGedy9Pt |
| 12 | EEYivtK8 | CES4MiST |
| 13 | 2LhQaE8F | mhAc28cg |
| 14 | 2yDRMVXN | Vju0ofH0 |
| 15 | RI87AOP0 | O4fC0UkL |
DonkeyCar Setup
With Terminal 1 running the GPS corrections, open a new terminal (Terminal 2). We will create a DonkeyCar application using the follow-path template — a specialized template built for GPS waypoint navigation — and configure it with the correct serial ports, motor settings, and controller button mappings.
Step 1 — Create the Car Directory
# This terminal uses the DonkeyCar venv only — do NOT activate py37 here
conda deactivate   # Repeat until neither (base) nor (py37) appears in the prompt
source ~/env/bin/activate   # Activate the DonkeyCar venv — prompt shows (env)

# Create the GPS car directory using the follow-path template
donkey createcar --template-path follow-path --path ~/gpscar
follow-path template is the only one with built-in GPS waypoint recording and playback. Using any other template will be missing the PathFollower and GPSController parts required for autonomous GPS laps.Step 2 — Edit myconfig.py
The myconfig.py file overrides DonkeyCar's default settings. Open it and add or uncomment the following blocks. Each setting includes an inline comment explaining why that value was chosen.
nano ~/gpscar/myconfig.pyA — GPS Settings
# GPS_SERIAL: The port the PointOneNav uses to stream NMEA GGA data to DonkeyCar.
# This must be the OPPOSITE port from --device-port used in the runner (Terminal 1).
# Example: if the runner uses /dev/ttyUSB1, set this to /dev/ttyUSB0.
GPS_SERIAL = "/dev/ttyUSB0"

# Baud rate for the PointOneNav. Do NOT change this value —
# 460800 is the fixed output rate configured by config_tool.py in §3.
GPS_SERIAL_BAUDRATE = 460800

# Prints GPS coordinate data to the console — useful for debugging.
# Set to False once everything is working to reduce terminal noise.
GPS_DEBUG = True

# Master switch — must be True or DonkeyCar ignores all GPS settings.
HAVE_GPS = True

# Only needed for file-based GPS replay. Leave as None for live GPS operation.
GPS_NMEA_PATH = None
B — VESC Motor Settings
# Selects the VESC motor controller driver.
DRIVE_TRAIN_TYPE = "VESC"

# Caps throttle at 50% of the VESC's maximum to prevent crashes during testing.
# Increase in small increments (0.55, 0.60…) only after several stable autonomous runs.
VESC_MAX_SPEED_PERCENT = 0.5

# The USB-serial port the VESC enumerates as. Usually ttyACM0, sometimes ttyACM1.
VESC_SERIAL_PORT = "/dev/ttyACM0"
VESC_BAUDRATE = 115200

# Steering scale: maps the [-1, 1] steering command to the actual servo PWM range.
# 0.5 means only the middle half of the servo's travel is used, reducing overcorrection.
VESC_STEERING_SCALE = 0.5

# Steering offset: 0.5 corresponds to the mechanical center of the servo.
# Adjust by ±0.02 increments if the car consistently drifts on a straight path.
VESC_STEERING_OFFSET = 0.5
C — Joystick / Controller Settings
# Enable the joystick as the primary control input (required for recording laps).
USE_JOYSTICK_AS_DEFAULT = True

# Limits manual throttle to 50%. Keep this in sync with VESC_MAX_SPEED_PERCENT.
JOYSTICK_MAX_THROTTLE = 0.5

# Controller type. Change to 'xbox', 'F710', or 'custom' for other gamepads.
CONTROLLER_TYPE = 'ps4'

# Linux input device file for the controller.
# Run: ls /dev/input/js* to confirm the correct device number.
JOYSTICK_DEVICE_FILE = "/dev/input/js0"
D — Button Mappings
# R1: Write the currently recorded waypoints to a CSV file on disk.
SAVE_PATH_BTN = "R1"

# X: Load the saved path from disk into memory — press this before autonomous playback.
LOAD_PATH_BTN = "X"

# B: Set the car's current GPS position as the local coordinate origin (0, 0).
# Press this BEFORE recording a new path and again before each autonomous run.
RESET_ORIGIN_BTN = "B"

# Y: Clear all waypoints from memory without saving — useful for discarding a bad run.
ERASE_PATH_BTN = "Y"

# L1: Toggle waypoint recording on/off. Press once to start, again to stop.
TOGGLE_RECORDING_BTN = "L1"

# PID adjustment buttons — set to None to disable runtime PID changes via controller.
INC_PID_D_BTN = None
DEC_PID_D_BTN = None
INC_PID_P_BTN = None
DEC_PID_P_BTN = None
E — Camera Type
# MOCK disables the camera pipeline entirely. GPS laps do not require a camera.
# Using MOCK prevents startup errors if no camera is physically attached to the Pi.
CAMERA_TYPE = "MOCK"
ls /dev/ttyUSB* /dev/ttyACM* and confirm your assignments: the GPS NMEA port goes into GPS_SERIAL, the VESC port into VESC_SERIAL_PORT. Mixing these up is the most common configuration mistake and causes a silent failure where neither device responds.Driving & Recording a Path
DonkeyCar's path-following system is built on recorded GPS waypoints, not a pre-defined map. You physically drive the car around the loop once to teach it the route. As you drive, the car samples its GPS position at regular intervals and saves each position as a waypoint. During autonomous playback, the car steers toward each waypoint in sequence to reproduce the driven path.
Step 1 — Launch DonkeyCar
cd ~/gpscar
python manage.py drive
Step 2 — Recording Procedure
Validate the Saved Path
# Confirm the file exists and is not empty
ls -lh ~/gpscar/path.csv

# Preview the first few waypoints (columns are x, y or lat/lon depending on config)
head -5 ~/gpscar/path.csv

# Count total waypoints — a typical 100 m loop at the default sample rate produces 200–600 points
wc -l ~/gpscar/path.csv
wc -l returns fewer than 50 waypoints, the GPS likely lost its fix during recording (check Terminal 1 for nan values) or recording was not properly started. Re-run the entire recording procedure from a fresh DonkeyCar session.Autonomous Path Playback
Autonomous playback loads the saved CSV path and uses a PID controller to steer the car toward each successive waypoint. The car computes its cross-track error (lateral distance from the ideal path line) and its heading error, then sends corrective steering commands to the VESC.
path.csv into memory. The terminal will confirm how many waypoints were loaded.Optional: Monitor Autopilot Mode in a Separate Terminal
To see when autopilot is engaged and disengaged, tail the DonkeyCar log file in a third SSH session. This is useful during initial testing to confirm the mode switch is registering correctly.
# Tail the DonkeyCar log and filter for mode-change messages
tail -f ~/gpscar/logs/donkey.log | grep -i "mode\|autopilot\|pilot"

# Expected output when autopilot is engaged:
# INFO:donkeycar.parts.controller:auto_pilot mode
PID Tuning Guide
If the car oscillates side-to-side, cuts corners, or drifts wide on straights, the PID gains in myconfig.py need adjustment. PID tuning is an iterative process — follow the strategy below in order and only adjust one gain at a time.
Understanding the Gains
| Gain | Role | Too Low | Too High |
|---|---|---|---|
| P (Proportional) | Applies an immediate correction force proportional to the current cross-track error (how far the car is from the path) | Car turns too slowly, misses corners (understeer) | Car weaves wildly, oscillating around the path |
| D (Derivative) | Dampens corrections based on the rate of change of the error — anticipates and counters overshoot | No damping — P-driven oscillations persist | Jerky, over-damped steering; car feels sluggish and unresponsive |
| I (Integral) | Corrects for sustained long-term drift by accumulating error over time | Persistent one-sided drift if wheel geometry is uneven | Slow, creeping oscillation that builds over many seconds |
Tuning Strategy (Follow in Order)
PID_D = 0.0 and PID_I = 0.0 in myconfig.py. Start with a small P value (e.g., PID_P = 0.1). Run the car and increase P in increments of 0.05 until the car follows the path but shows noticeable side-to-side oscillation. That oscillation point is your P reference value.PID_I = 0.01). For most setups on flat pavement with balanced wheels, I can safely remain at 0.VESC_MAX_SPEED_PERCENT by 0.05. At higher speeds the car covers more distance per PID cycle, which amplifies the effect of P. You may need to reduce P slightly at higher speeds and re-tune D accordingly.PID Values in myconfig.py
# Suggested starting values for a Warren Mall loop at 50% throttle
PID_P = 0.15   # Increase until the car follows the path but begins to oscillate
PID_D = 0.6    # Increase to dampen oscillations (target ~3–5× the P value)
PID_I = 0.0    # Leave at 0 unless experiencing consistent one-sided drift
Troubleshooting & Known Issues
GPS & Serial Port
| Problem | Root Cause | Fix |
|---|---|---|
Permission denied: /dev/ttyUSB1 | User not in dialout group | Run sudo adduser pi dialout && sudo reboot |
[LLA=nan, nan, nan] outdoors | GPS antenna obstructed or RTK stream dropped | Verify Terminal 1 is connected to Polaris; re-seat the SMA connector on the antenna |
serial.SerialException: [Errno 2] No such file | Wrong port number (USB0 vs USB1) | Run ls /dev/ttyUSB* and update --device-port in the runner command or GPS_SERIAL in myconfig.py |
| GPS coordinates frozen — not updating | Runner process silently crashed | Check Terminal 1 for error messages and restart the runner |
| Polaris authentication fails | Wrong device ID or password | Cross-check the credentials table in §4; each robot has a unique pair |
DonkeyCar & Path Recording
| Problem | Root Cause | Fix |
|---|---|---|
manage.py drive exits immediately | HAVE_GPS missing or wrong DRIVE_TRAIN_TYPE in myconfig.py | Verify all settings from §5; check for typos in variable names |
| Path CSV is empty after recording | Recording was not started, or GPS had no fix during the run | Confirm a "recording started" message appeared in the terminal; verify Terminal 1 is showing valid LLA coordinates |
| Car ignores the path during autonomous mode | Origin was not reset before loading the path | Always press B (Reset Origin) BEFORE pressing X (Load Path) |
| VESC not responding — car does not move | Wrong serial port for VESC, or VESC not powered | Run ls /dev/ttyACM*; confirm the VESC ESC LED is solid green |
| Controller buttons do not work | Wrong CONTROLLER_TYPE or joystick device number | Run ls /dev/input/js* and test with jstest /dev/input/js0 |
| Car drifts sideways on a straight path | Steering offset incorrect or wheel sizes unequal | Adjust VESC_STEERING_OFFSET by ±0.02 increments; add a small PID_I value if drift persists |
Environment & Python
| Error | Fix | |
|---|---|---|
ModuleNotFoundError: No module named 'fusion_engine_client' | The correct environment is not active. For Terminal 1 (runner): run conda activate py37. For Terminal 2 (DonkeyCar): run source ~/env/bin/activate. | |
mamba: command not found after reboot | Conda init was not added to .bashrc. Run conda init bash && source ~/.bashrc | |
config_tool.py reports "device busy" | Another process is holding the serial port open | Close all other terminals that may be using the GPS port; reboot if needed |
| Miniforge installer fails with wrong architecture | 32-bit Pi OS paired with 64-bit installer URL | Run uname -m to confirm the architecture; download the matching installer from the Miniforge releases page |
WiFi & RTK Accuracy
| Symptom | Fix |
|---|---|
| GPS accuracy degrades from centimeters to meters mid-run | WiFi extender lost its connection to the campus network — reposition the antenna to face EBU2 and check the ALLWEI battery charge level |
| RTK correction stream drops repeatedly | Campus firewall may be blocking the Polaris port — try connecting via a mobile hotspot to isolate whether it is a network issue |
| GPS position jumps several meters suddenly | Multipath signal reflection from a nearby building — move the car away from walls and operate in the open Warren Mall area |
UCSD Jacobs School of Engineering — ECE/MAE 148 Intro to Autonomous Vehicles