Install Raspberry Pi Imager
Raspberry Pi Imager is the official tool for writing OS images to a microSD card. It handles downloading the OS, verifying the image, writing it to your card, and applying customizations like hostname, WiFi, and SSH — all in one place. Always use the most current version.
New to this? Think of the microSD card as the Pi's hard drive. Flashing the OS means copying the operating system onto that card so the Pi has something to boot from. Imager automates the entire process.
Do NOT install Debian Trixie. Trixie ships with Python 3.13, which breaks DonkeyCar and is the root cause of all camera issues reported in this class.
https://www.raspberrypi.com/software/| Setting | Value | Why |
|---|---|---|
| Device | Raspberry Pi 5 | Selects the correct ARM64 kernel and firmware |
| OS | Raspberry Pi OS (Legacy, 64-bit) | Python 3.11 — required for DonkeyCar 5.2.x |
| Storage | Your 128 GB microSD card | Target device for the OS image |
Flash the OS — Choose the Correct Image
After selecting your device, click OS to choose the operating system. You must scroll down to find the Legacy version. The default recommended image shown at the top of the list is Trixie (Python 3.13), which will break DonkeyCar — do not select it.
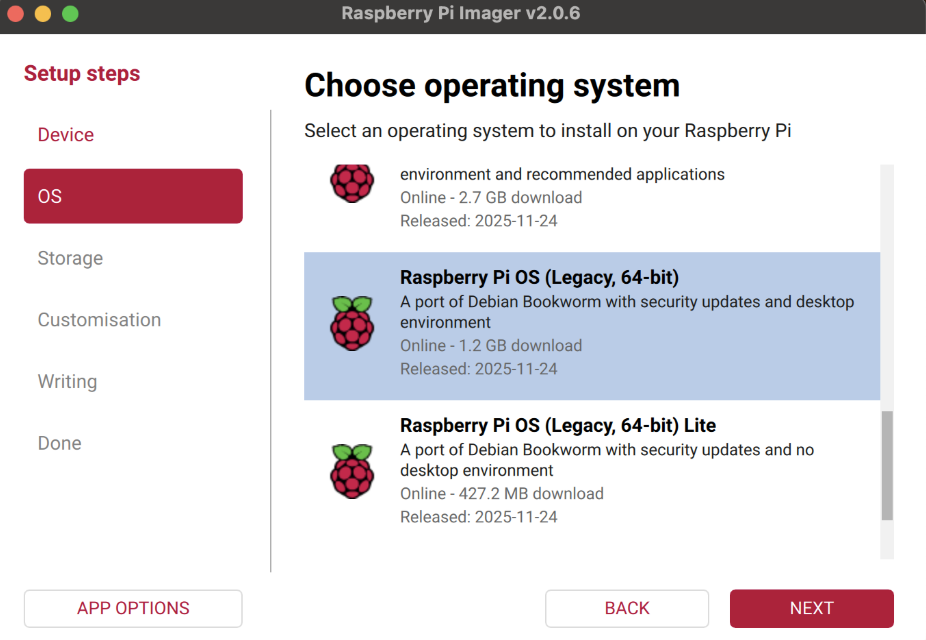
Raspberry Pi OS (Debian Trixie) → Python 3.13 → DonkeyCar broken ✗ / camera broken ✗
Why the Legacy Image?
DonkeyCar 5.2.x depends on several Python packages whose C extensions are only compiled for Python 3.11. Attempting to install them on Python 3.13 will either fail entirely or produce silent runtime errors that show up as camera failures — the most common issue reported in this class. There is no workaround; you must use the Legacy image.
Configure Hostname
Before writing the image, click NEXT → Edit Settings (or the gear icon in older versions) to open the customization wizard. The first thing to set is your hostname. This is the human-readable name your Pi broadcasts on the local network — it is how you SSH into it using .local address resolution instead of having to look up an IP address.
Hostname Naming Convention
ucsdrobocar-148-XX where XX is your two-digit team number.Example: Team 7 →
ucsdrobocar-148-07TA unit:
ucsdrobocar-148-TA
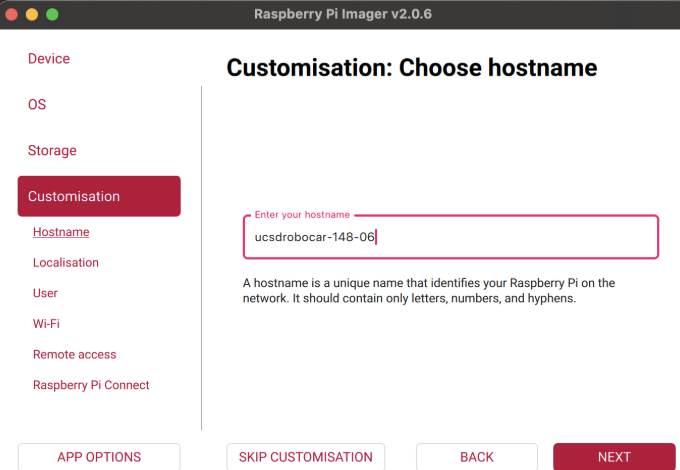
ucsdrobocar-148-XX — replace XX with your two-digit team number (e.g., 07 for Team 7).Localization Settings
On the Localization tab, set the fields below. These ensure the Pi uses the correct timezone and keyboard layout, which prevents subtle issues with scheduled tasks and terminal input.
| Field | Value |
|---|---|
| Capital city | Washington, D.C. (United States) |
| Time zone | America/Los_Angeles |
| Keyboard layout | us |
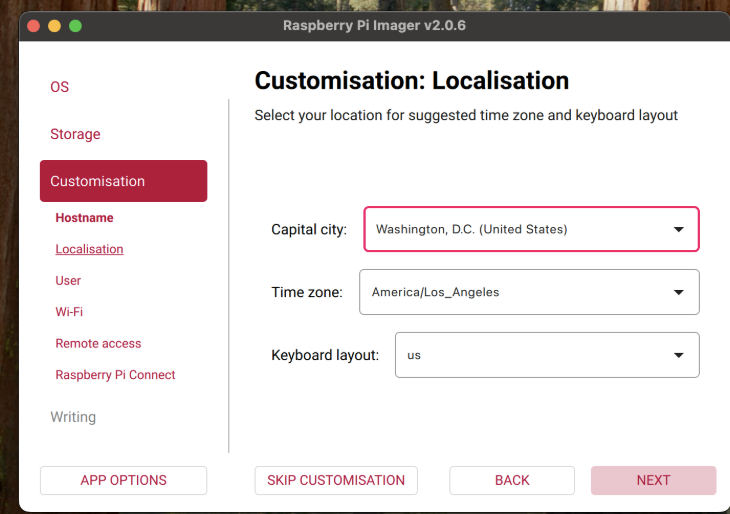
Set Username, Password & WiFi
Username & Password
On the User tab, set the username to pi. This is the account you will use every time you SSH into the Pi. Choose a password you will remember and share only with your team.
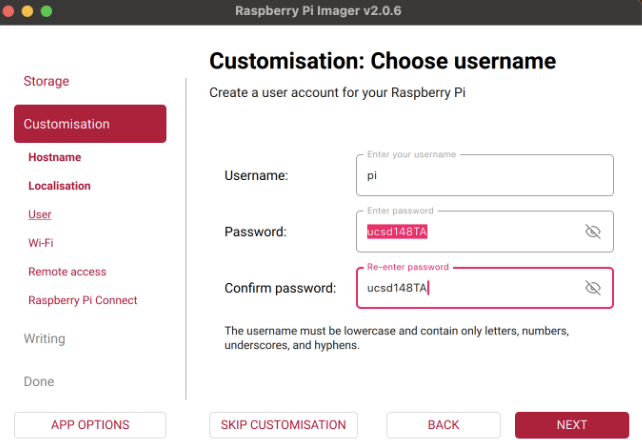
pi and choose a secure password. The TA reference password shown here (ucsd148TA) is for documentation purposes only — do not use it on your own car.WiFi Configuration
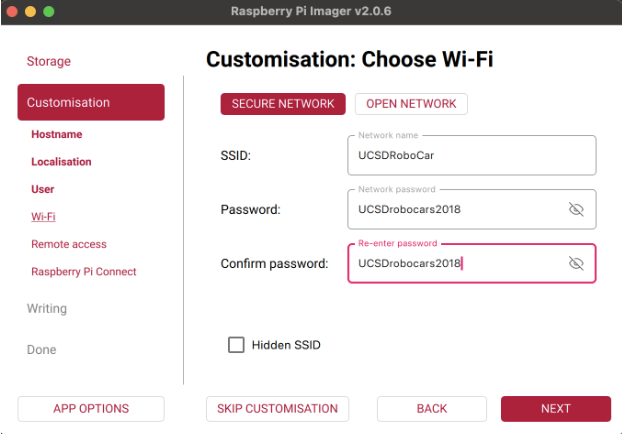
On the Wi-Fi tab, enter the class network credentials. Pre-loading WiFi here means the Pi will automatically connect to the network on its very first boot, so you can SSH in right away without needing a monitor or keyboard attached.
| Location | SSID | Password |
|---|---|---|
| On-campus (class) | UCSDRoboCar | UCSDrobocars2018 |
| Home / hotspot | Your network name | Your network password |
Enable SSH & Write the Image
Enable SSH
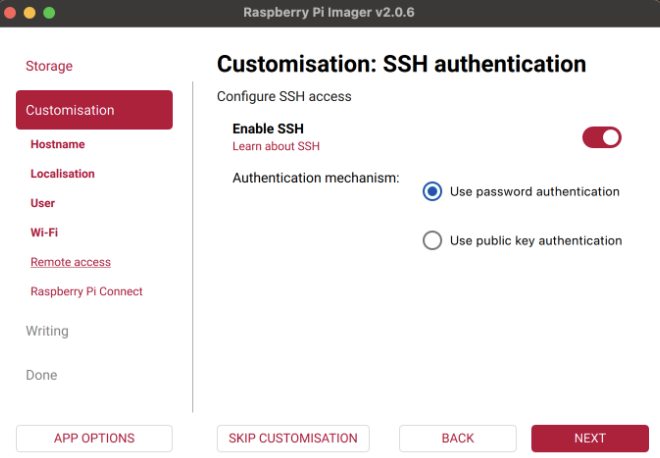
SSH (Secure Shell) is the protocol that lets you control the Pi remotely from your laptop over the network — no monitor or keyboard required. On the Remote Access tab, toggle Enable SSH on and select Use password authentication. Without this step, the Pi will boot but you will have no way to connect to it.
Raspberry Pi Connect (Optional)
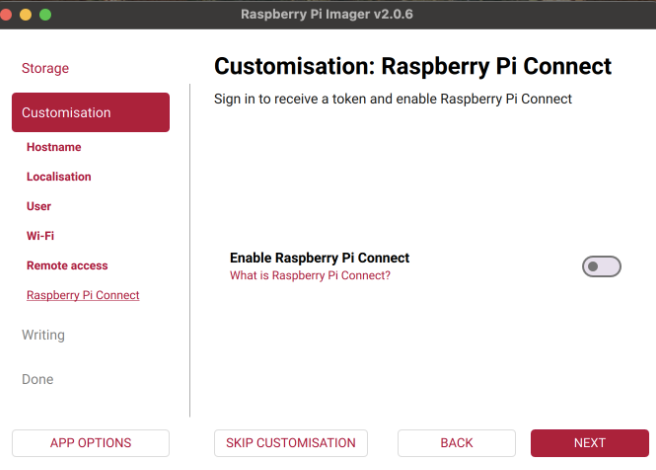
The Raspberry Pi Connect tab offers a cloud-based remote desktop service from Raspberry Pi. This is not needed for this class — leave it disabled.
Review and Write
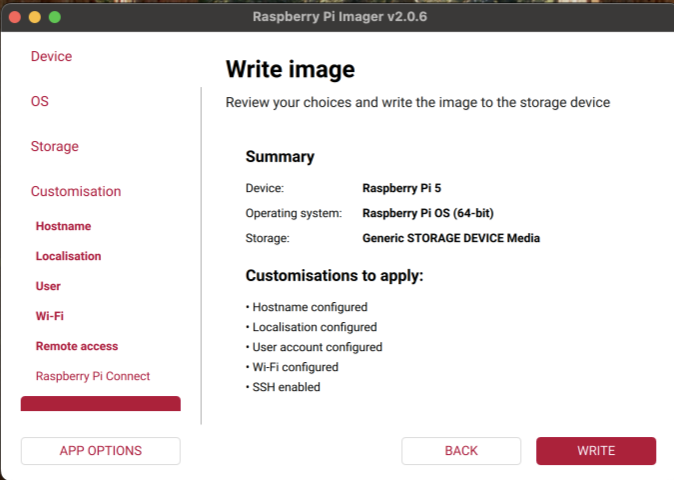
After completing all the customization tabs, the Imager will show a summary of everything you configured. Review it carefully, then click WRITE. The Imager will download the OS image (if not already cached) and flash it to your card — this typically takes 5–15 minutes.
Write Complete — Eject Safely
When writing finishes, the Imager will show a success screen. Click Finish, then follow this exact ejection sequence to avoid corrupting the card:
umount /dev/sdX on Linux) to safely flush all pending writes to the card. Do not physically remove the card yet.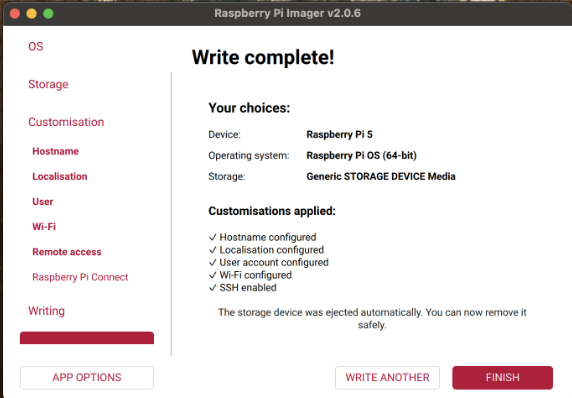
Cooling & Hardware Assembly
The Raspberry Pi 5 runs significantly hotter than previous models under sustained workloads like neural network inference. The active cooler (heatsink + fan) that comes with your kit is required — not optional. Assemble everything before powering on for the first time.
Step-by-Step Assembly
raspi-config.
First Boot & SSH Connection
Plug in the USB-C power supply to boot the Pi. On first boot, the Pi automatically performs initial setup tasks — expanding the filesystem, creating your user account, and applying all the customizations you configured in the Imager. This process can take 2–5 minutes and the Pi may reboot once on its own during this time. The green activity LED on the board will flash rapidly while it works. Do not unplug it.
Connect via SSH
Once the Pi has finished its initial boot sequence and connected to your WiFi network, you can SSH into it from any device on the same network. Open a terminal on your laptop and run the command below, replacing XX with your two-digit team number.
ssh pi@ucsdrobocar-148-XX.local

# Example for Team 5:
ssh pi@ucsdrobocar-148-05.local
.local suffix uses a protocol called mDNS (multicast DNS) to automatically resolve your Pi's hostname to its IP address on the local network. This means you never need to look up or remember the Pi's IP address — as long as your laptop and the Pi are on the same WiFi network, the hostname will resolve automatically. On Windows, mDNS requires Bonjour (see troubleshooting table below if it does not work).
First Connection Security Prompt
The first time you SSH to a new Pi, your terminal will display a message asking you to verify the host's identity. This is a standard SSH security check. Type yes to accept and save the Pi's fingerprint — your computer will not ask again for this host.
# The authenticity of host 'ucsdrobocar-148-05.local' can't be established.
# ECDSA key fingerprint is SHA256:xxxxxxxxxxxxxxxxxxxx.
# Are you sure you want to continue connecting (yes/no/[fingerprint])? yes
Troubleshooting First Boot Connection
| Problem | Cause | Fix |
|---|---|---|
ssh: Could not resolve hostname | Pi has not finished booting, or mDNS is not working on your laptop | Wait 2–3 more minutes. Ensure both devices are on the same WiFi network. On Windows, install Bonjour Print Services to enable mDNS. |
Connection refused | SSH daemon has not started yet — Pi is still booting | Wait and retry. The green activity LED should slow down or stop fast-flashing before SSH becomes available. |
Permission denied | Incorrect password | Re-check the password you set in the Imager customization step. |
| Cannot find Pi at all after several minutes | WiFi credentials were entered incorrectly during flashing | Re-flash the card with the correct WiFi credentials, or temporarily connect the Pi to your router via Ethernet cable for initial setup. |
WiFi Configuration
Once connected via SSH, you can manage WiFi networks directly from the command line. The Pi uses NetworkManager to handle wireless connections. You can use either nmtui (a simple text-based menu UI) or nmcli (a direct command-line tool).
List Available WiFi Networks
sudo nmcli device wifi list # List all visible WiFi networks
Add a New WiFi Network via nmtui (Recommended)
nmtui is the easiest way to add new networks because it provides an interactive menu you can navigate with arrow keys. Launch it and choose Activate a connection to connect to a visible network, or Edit a connection to add one manually (for example, a hidden SSID like your phone hotspot).
sudo nmtui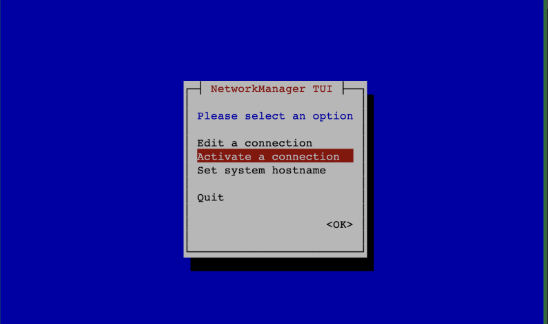
Add a Network via Command Line (Alternative)
# Connect to a WiFi network by SSID and password
sudo nmcli device wifi connect "NETWORK_NAME" password "NETWORK_PASSWORD"

# Class network example:
sudo nmcli device wifi connect "UCSDRoboCar" password "UCSDrobocars2018"
Get the Pi's IP Address
If you ever need the Pi's numeric IP address (for example, to use an SSH client that does not support .local hostnames), run ifconfig and look at the wlan0 interface. The inet field shows the current IPv4 address.
ifconfig
# Look for wlan0 → inet field (e.g., 192.168.x.x)
Install nano Text Editor
nano is a simple command-line text editor that makes editing configuration files much easier than the default vi. Install it now — it will be needed in later steps.
sudo apt-get update
sudo apt-get install nano
System Settings
If you need to change the hostname or password after flashing — for example, if you inherited a Pi from a previous team — use raspi-config or the commands below. Always follow the class hostname standard so your car is identifiable on the network.
Change Hostname with raspi-config
raspi-config is the Raspberry Pi's built-in configuration tool. It provides a simple menu for changing common system settings. Launch it from the terminal and navigate to System Options → S4 Hostname to update your hostname.
sudo raspi-config
# Navigate: System Options → S4 Hostname
# Set to: ucsdrobocar-148-XX (replace XX with your team number)
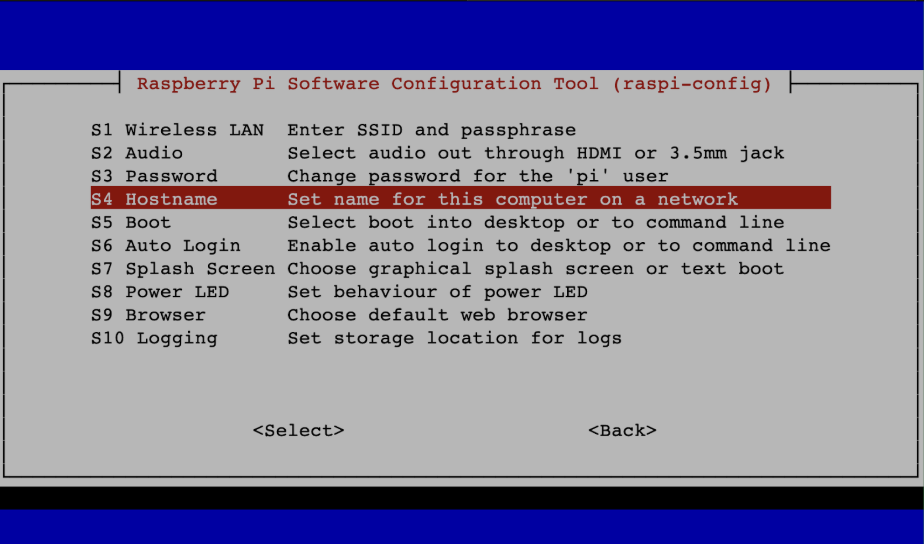
Change Hostname via Command Line
Alternatively, you can update the hostname directly from the terminal. You must update it in two places — the active hostname via hostnamectl, and the local hosts file at /etc/hosts. Skipping either step will cause errors.
# Step 1: Set the active hostname
sudo hostnamectl set-hostname ucsdrobocar-xxx-yy

# Step 2: Update the hosts file to match
sudo nano /etc/hosts
# Find the line that reads: 127.0.1.1  old-hostname
# Change it to:              127.0.1.1  ucsdrobocar-xxx-yy
# Save with Ctrl-X → Y → Enter
hostnamectl set-hostname without updating /etc/hosts, every sudo command will print the warning: "sudo: unable to resolve host ucsdrobocar-xxx-yy". This does not break anything, but it clutters your terminal output. Update both files to avoid it.Change Password
passwd # Changes the password for the current user (pi)
View Current System Information
hostnamectl # Shows hostname, OS version, kernel, and architecture
Reboot to Apply All Changes
sudo reboot nowDate & Time Configuration
The Raspberry Pi 5 does not have a battery-backed real-time clock (RTC), meaning it loses track of the current time whenever it is powered off and disconnected from the internet. If the Pi's clock is wrong, apt will refuse to install packages because SSL/TLS certificates will appear to be expired or not yet valid. Always check the date before debugging installation failures.
apt update or pip install fails with SSL or certificate errors, the system clock is almost certainly wrong. Run date to check it before asking for help or debugging further.Check the Current Date
date # Prints the current system date and time
Manually Set Date and Time
If the Pi is not yet connected to the internet or NTP has not synced, set the time manually using the command below. Replace the timestamp with the current date and time.
sudo date -s '2025-09-15 10:30:00' # Replace with current date/time
Set the Timezone
sudo dpkg-reconfigure tzdata
# Navigate: America → Los_Angeles
Install NTP for Automatic Time Sync
NTP (Network Time Protocol) automatically synchronizes the system clock with internet time servers whenever the Pi has a network connection. Install it once and it will keep the clock correct on every subsequent boot.
sudo apt-get update
sudo apt-get install ntp

# Force an immediate time sync:
sudo /etc/init.d/ntp stop
sudo ntpd -q -g
sudo /etc/init.d/ntp start

# Reboot to confirm the time persists correctly:
sudo reboot now
sudo ntpd -q -gGUI Settings & Filesystem Expansion
Disable the GUI on Boot (Optional but Recommended)
Since you interact with the Pi exclusively over SSH, the desktop graphical environment (GUI) runs in the background doing nothing useful — consuming RAM and CPU that DonkeyCar's neural network inference could use instead. Disabling it is safe for headless operation and frees a noticeable amount of memory.
sudo raspi-config
# Navigate: System Options → S5 Boot → B1 Console (Text console)
# This sets the Pi to boot to a text terminal instead of the desktop
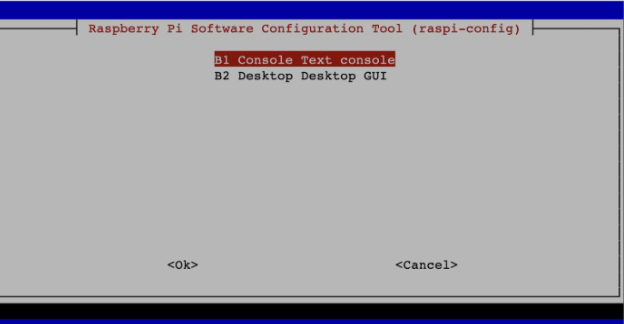
Expand the Filesystem
When the Imager writes the OS to your 128 GB card, it only creates a partition large enough to hold the OS image itself (~2–4 GB). The rest of the card is unused unallocated space. You must expand the filesystem to claim all remaining space — otherwise you will run out of disk space during DonkeyCar installation.
sudo raspi-config
# Navigate: Advanced Options → A1 Expand Filesystem
# Select OK and reboot when prompted
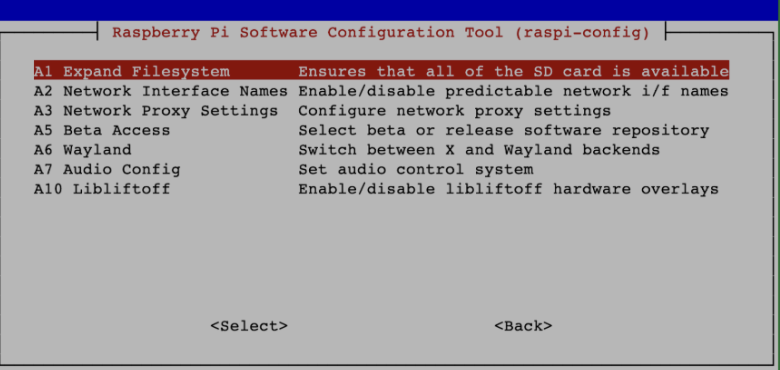
Update and Upgrade the System
After expanding the filesystem, run a full system update to install the latest security patches and ensure all package lists are current. Do this before installing DonkeyCar.
sudo apt update      # Refresh package lists from the internet
sudo apt upgrade     # Install available package updates (press Y when prompted)
sudo reboot now      # Reboot to apply any kernel updates
sudo apt full-upgrade can pull in kernel and firmware upgrades that break hardware compatibility with this class's software stack. Always use sudo apt upgrade (without "full") to install only safe package-level updates.Passwordless SSH (Key-Based Auth)
Key-based SSH authentication lets you connect to the Pi without typing a password each time. Instead of a password, your laptop uses a cryptographic key pair — a private key that stays on your laptop and a public key stored on the Pi. When you connect, SSH verifies the keys automatically. This is both more convenient and more secure than password auth.
Step 1 — Generate a Key Pair on Your Laptop
Run this command on your laptop (not the Pi). When prompted for a save location and passphrase, pressing Enter each time will use the default location (~/.ssh/id_rsa) with no passphrase — which is fine for development.
# Generate an RSA key pair
ssh-keygen -t rsa
# Press Enter to accept the default save location (~/.ssh/id_rsa)
# Press Enter twice to skip the passphrase (or set one if you prefer)
Step 2 — View Your Public Key
The public key is the part you share with other machines. Print it out so you can copy it in the next step.
# macOS / Linux / WSL:
cat ~/.ssh/id_rsa.pub

# Copy the entire output — it starts with "ssh-rsa AAAA..."
Step 3 — Add the Key to the Pi's Authorized Keys
SSH into the Pi using your password (as usual), then create the .ssh directory and paste your public key into the authorized_keys file. The Pi will trust any connection that presents the matching private key.
cd ~
mkdir .ssh          # Safe to ignore "File exists" error if it already exists
chmod 700 .ssh
sudo chown pi:pi .ssh
nano .ssh/authorized_keys
# Paste your public key on its own line (the entire ssh-rsa AAAA... string)
# Save: Ctrl-X → Y → Enter
chmod 600 .ssh/authorized_keys
Step 4 — Test the Connection
ssh pi@ucsdrobocar-148-XX.local
# Should connect WITHOUT prompting for a password
scp and rsync also work without passwords — making it easy to transfer trained DonkeyCar models and collected data logs between your laptop and the Pi.Backup & Troubleshooting
How to Back Up Your SD Card
Shut down the Pi gracefully (sudo shutdown now), wait for the green LED to stop blinking, then unplug power and remove the SD card. Insert it into your laptop and use a disk imaging tool to create a complete copy:
On macOS or Linux, use dd in a terminal to write a bit-for-bit copy to a .img file. On Windows, use Win32DiskImager — select your card as the source, choose a destination file path, and click Read.
Common Issues & Fixes
| Problem | Cause | Fix |
|---|---|---|
| Camera not working, all-black feed | Installed Debian Trixie (Python 3.13) instead of the Legacy image | Re-flash with Raspberry Pi OS Legacy 64-bit (Bookworm). There is no software fix — you must re-flash the card. |
apt update fails with SSL or certificate errors | System clock is set to the wrong date/time | Run date to check. If incorrect, follow Section 10 to set the correct time and install NTP. |
| Pi not found on network after reboot | WiFi credentials were entered incorrectly, or Pi is still booting | Wait 3 minutes. If still unreachable, re-check the SSID/password and re-flash, or temporarily use an Ethernet cable. |
sudo: unable to resolve host | Hostname was updated with hostnamectl but /etc/hosts was not updated to match | Edit /etc/hosts and update the 127.0.1.1 line to match the new hostname. See Section 9. |
| No space left on device | Filesystem was not expanded after flashing | Run sudo raspi-config → Advanced Options → A1 Expand Filesystem, then reboot. See Section 11. |
| Pi reboots unexpectedly under load | Power supply cannot deliver enough current — causes a voltage brownout | Use a 5V/5A (25W+) USB-C power supply. Underpowered supplies cause the Pi to reboot during CPU-intensive tasks like inference. |
| Fan not spinning | Fan cable not connected, or plastic protective film not removed from thermal pads | Power off, disassemble the cooler, remove all plastic film from both sides of each thermal pad, and reconnect the fan cable firmly. |
Connection refused on SSH | SSH was not enabled during the Imager customization step | Re-flash and enable SSH on the Remote Access tab, or connect a keyboard and monitor and run sudo raspi-config → Interface Options → SSH. |
Verify Your Python Version
After completing setup, run the following commands to confirm you have the correct Python version and OS release for DonkeyCar compatibility.
python3 --version
# Expected output: Python 3.11.x
# If you see Python 3.13.x — you flashed Trixie, not Legacy. You must re-flash.

cat /etc/os-release
# Expected: VERSION_CODENAME=bookworm
# If you see trixie — you must re-flash with the Legacy 64-bit image.
python3 --version shows 3.11.x and /etc/os-release shows bookworm, your Pi is correctly configured and ready for DonkeyCar installation. Proceed to the DonkeyCar guide.UCSD Jacobs School of Engineering — ECE/MAE 148 Intro to Autonomous Vehicles