Human Pose Estimation with OAKD-Lite and DepthAI
Our final project consisted of a robotic car that uses the OAKD-Lite camera to detect people in different poses and drives up to them to carry out corresponding actions. The goal was to detect and carry out actions for 3 main poses: a person standing up, a person with their head down, and a person with their hand raised. We were also able to detect a person sitting up straight, in which case the robot would not do anything.
To start, we used the class docker container for our code. Within our docker container, we have to ensure the X11 forwarding is set up. Once set up, we can proceed to give permissions to the OAKD-lite camera. This can be done by running these commands within both Jetson Nano and inside our docker container.
export OPENBLAS_CORETYPE=ARMV8" >> ~/.bashrc
echo 'SUBSYSTEM=="usb", ATTRS{idVendor}=="03e7", MODE="0666"' | sudo tee /etc/udev/rules.d/80-movidius.rules
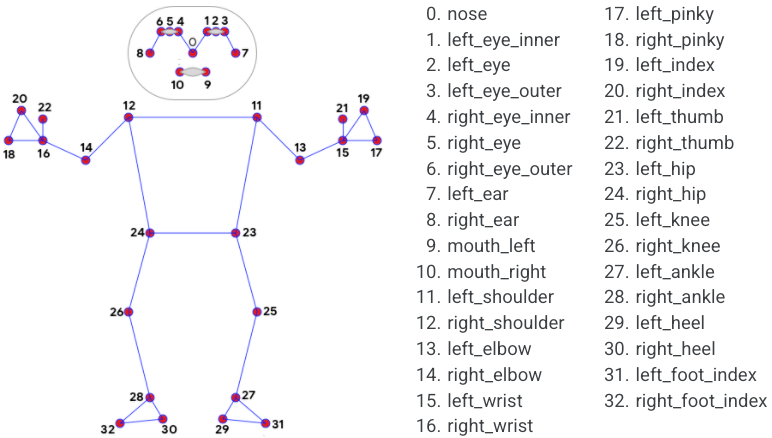
The key part of this project were the coordinates for each "landmark" on the human body. Using the DepthAI human pose model for reference, each point in the display window is a landmark that tracks a certain body part. By accessing the coordinates for each landmark, we can write code to compare the positions of landmarks against each other and find out if a person is doing a certain pose.
However, the Luxonis DepthAI model used in Roboflow has landmark points that are inaccessible without rewriting a lot of the code. Instead, we used a GitHub repository called depthai_blazepose. This repository uses BlazePose, a pose detection model created by Google researchers and integrates it into the DepthAI library to run on our OAKD-Lite camera. The link to the repository can be found here: DepthAI BlazePose
RUN git clone https://github.com/geaxgx/depthai_blazepose.git && \
    cd depthai_blazepose && \
    python3 -m pip install -r requirements.txt
Our team ran into certification errors while installing the requirements. If this happens, exit out of the docker container and restart it. Furthermore, there were issues with installing open3d from the reqirements text file. Manually installing open3d will fix the issue.
RUN pip install open3d
Once done, we can run the model within /depthai_blazepose/:
RUN python3 demo.py
There are numerous arguments that can be added to the end of demo.py. These are optional, but the two notable ones are lm_m ['lite', 'heavy', 'full'] and -xyz.
The argument lm_m has to be followed with one of the three options and is used to select a lighter or heavier model for better performance on your hardware.
The argument -xyz displays the distance of a person's waist relative to the center of the camera in centimeters.
Note that the y-coordinate of distance and landmarks is negative when above a person's waist and positive when below a person's waist.
To display the coordinates of all landmarks, open demo.py in a text editor and navigate to this code block:
while True:
    # Run blazepose on next frame
    frame, body = tracker.next_frame()
    if frame is None: break
    # Draw 2d skeleton
    frame = renderer.draw(frame, body)
    key = renderer.waitKey(delay=1)
    if key == 27 or key == ord('q'):
        break
renderer.exit()
tracker.exit()
Add the following lines of code under the first break statement:
if body:
        landmark_coords = body.landmarks_world
This will create a list called landmark_coords that constantly display the location all landmarks detected by BlazePose. Each element is a list in the form [x, y, z].
The image below shows all of the landmarks detected by BlazePose. The numbered list corresponds with each landmark's index in landmark_coords.

A video showcasing pose detection is down below:
A video showcasing pose detection with driving functionality is down below: